Clone Builders How to Build: Your First Build From Prompt to Finished
How to build in Clone Builders step by step: enter a build idea, pick a Location, start the job with your clones, track Crew progress, and check the finished build.
Quick answer
To finish a first build in Clone Builders, give your clones one clear idea, place the project, confirm the job so the assigned clones start assembling it, and watch the Crew status and piece counter until the finished structure stands in the world. The official game page describes the loop as giving your clones an idea and watching them get to work: the clones follow a structured building system (not AI generation) to place, resize, move, and assemble parts into creations.
- Enter a clear, single-subject build idea in the build menu
- Choose a Location: Choose spot, At my feet, or Random
- Confirm the project — three clones are assigned in the documented walkthrough — and the clones assemble it in real time
- Track the Crew window's build status and piece counter until the creation is finished
From prompt to construction start
Redeem steps
- Enter a build idea
Open the build menu and type your idea. Start with a clear object or character prompt rather than a complicated scene.
- Choose a Location
Pick Choose spot to place the build manually, At my feet to drop it where you stand, or Random for an open nearby area.
- Set the crew
Choose how many clones work on the job; in the documented walkthrough, three clones are assigned to it.
- Confirm the project
On a clear surface, the clones collect the pieces and put the model together in real time.
- Check that work has started
If the build looks small, don't cancel immediately — first determine whether the system is still processing the request or whether the prompt produced a compact result.
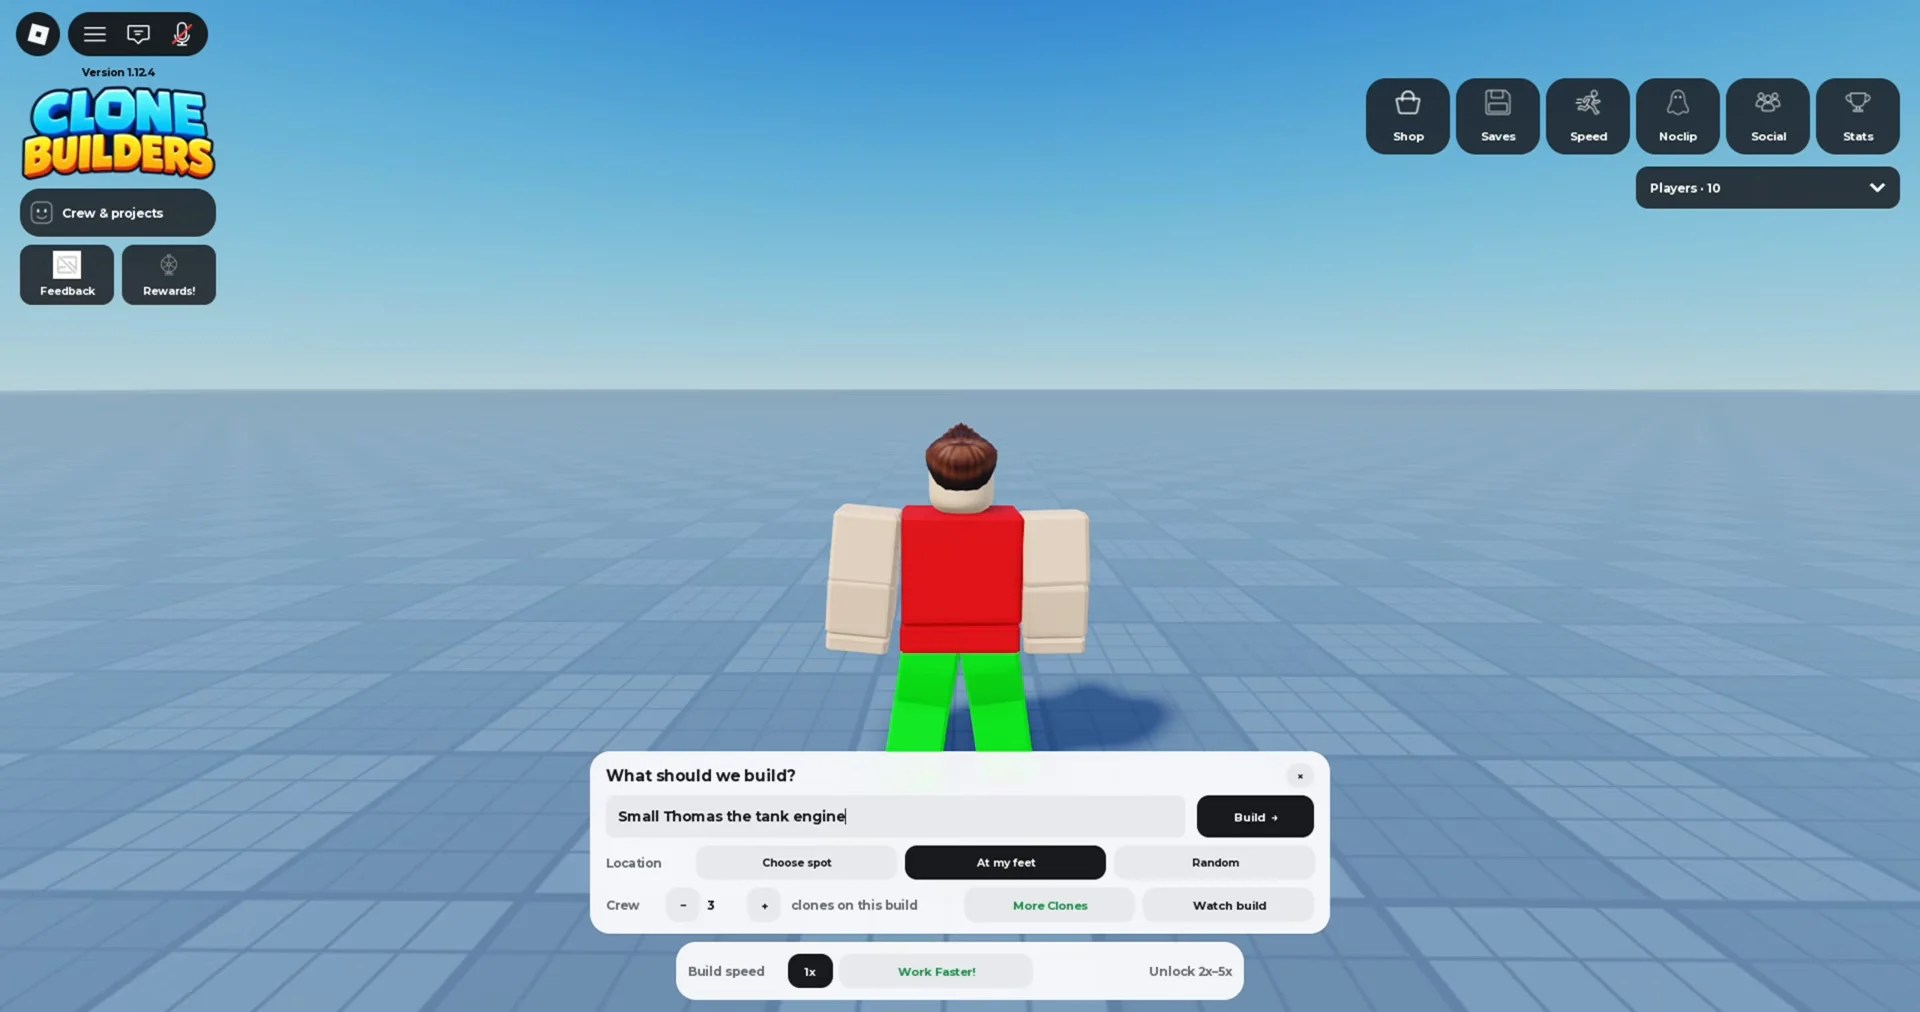
Documented first-build play matches this order: the player types a prompt (a YouTube logo), moves to an open area, places the build, starts it, and watches the clones begin. Clone Builders is constantly evolving, so treat these menu labels as the documented flow and confirm the current option names in game.
Choosing your first build prompt
Your first build should be a single recognizable subject — avoid combining several characters, vehicles, and actions until you understand how the builder interprets prompts. Use short prompts for simple objects, logos, or basic characters. Descriptive size words such as "small," "large," or "massive" can be tested with experience, but they may create a much bigger project than expected.
Clear, focused ideas produce the most reliable results. Clone work varies by project, so expect to give the clones a clear objective and adapt to what they create rather than expecting one exact result. Start with small projects and gradually move toward more complicated structures as you learn the building system, and stay next to the project during your first few builds — watching how the clones interpret a prompt teaches you the difference between a clear instruction and one that is too vague or complicated.
Placement to settle before the clones start
Placement is settled before the clones start work. Place the project where the workers can move around it, and avoid tight corners, walls, and areas occupied by another build. Prepare a clear working zone before activating the project; open placement also gives you a better camera angle when checking the finished result.
Comparison
| Setup Check | Why It Matters | Better Practice |
|---|---|---|
| Clear placement area | Prevents overlapping structures | Remove nearby obstructions |
| Stable foundation | Improves alignment | Begin with a simple base |
| Open access route | Helps with inspection | Leave space around entrances |
| Visible progress area | Makes construction easier to track | Keep the project in view |
Crowded placement can make it difficult to identify the correct object or to tell whether a problem comes from the build itself or the surrounding environment.
Tracking progress while the clones build
While the clones work, the Crew management window shows each clone's status — states such as "CLONE 1: BUILDING" appear for each active worker — alongside a live piece counter for the model. Gameplay footage also shows a percentage progress readout during a large build, around 47–48% and described as nearly halfway done.
Expect the structure to come together in stages: a simple foundation first, then the main shape, with smaller details added only after the structure is stable and correctly proportioned. Large builds can take considerably longer than small ones, so use one project at a time at first until you understand how quickly the clones work and how much room each creation needs. It's currently unclear whether multiple builds can run at once — gameplay commentary describes having to wait for the current build to finish before starting anything else — so plan on one active project until you see otherwise in game.
Recognizing a finished build and checking it
Don't wait for a special completion screen: when the clones finish, the completed creation standing in the world is the signal. In documented first-build play, the player views the finished logo build and judges it "pretty good for first build." Completing builds is also tracked as progression milestones — the game currently offers the badges "Finished a build!", "1 Hour Playtime!", and "Finished 10 Builds!", each tied to natural building milestones players reach while building.
Checklist
- Confirm the build is finished
The completed creation stands in the world to inspect.
- Check your milestone badges
Finished builds count toward tracked badges such as 'Finished a build!' and 'Finished 10 Builds!'
- Confirm the foundation is level and correctly positioned
Review the build before adding more detail.
- Keep the clone work zone clear
Leave the area around the finished structure unobstructed while you review.
- Check that major components are present
Make sure the main parts of your idea all made it into the structure.
- Test entry points, collision, and movement
Confirm the finished build behaves correctly when interacted with.
Related Guides
Build Prompts: Entering a Build Idea
Write build ideas the crew can act on: menu steps, wording tips, and the observed input limits before you hit Build.
Build Placement: Choosing a Location
Compare the three Location options — Choose spot, At my feet, and Random — and learn how to pick an open, reachable spot.
Build Progress: Percentage and Piece Counts
Read live build progress in the Crew window: per-clone status labels, the percentage and piece counter, and the complete banner.
Finish a Build: Knowing When It Is Done
Know exactly when a project counts as done, and confirm the Finished a build! milestone through your Roblox badge.